In dentistry, preventing working site infection can prove to be a challenge along with chances of cross-contamination and potential disease transmission despite our best attempts to use standard aseptic protocols. Even documentation can lead to cross-contamination if proper precautions are not taken. This article by Dr Mayur Davda provides standard protocols that can be followed in the clinic for successful documentation while minimizing cross-contamination.
We are all taking extra precautions to prevent the spread of SARS-CoV-2 in our personal as well as professional lives. Studies have proven that air in an operatory & surfaces like the floor of the room harbouring corona positive cases, soles of the shoes, doorknobs etc also have high viral loads enough to cause the spread of infection. Due to the coronavirus episode, it is even more important to avoid the use of phones in the operatory be it for communication purposes or for documentation because phones are one of the most frequently touched surfaces and hence have a high potential to spread infections.
It is important to note before we begin that the DSLR, as well as intraoral accessories like the mirror, have to be handled by the surgeon himself.
Let us go through the following step-by-step instructions that will make it easy for you to perform safety procedures and use the supplies and equipment needed for excellent documentation.
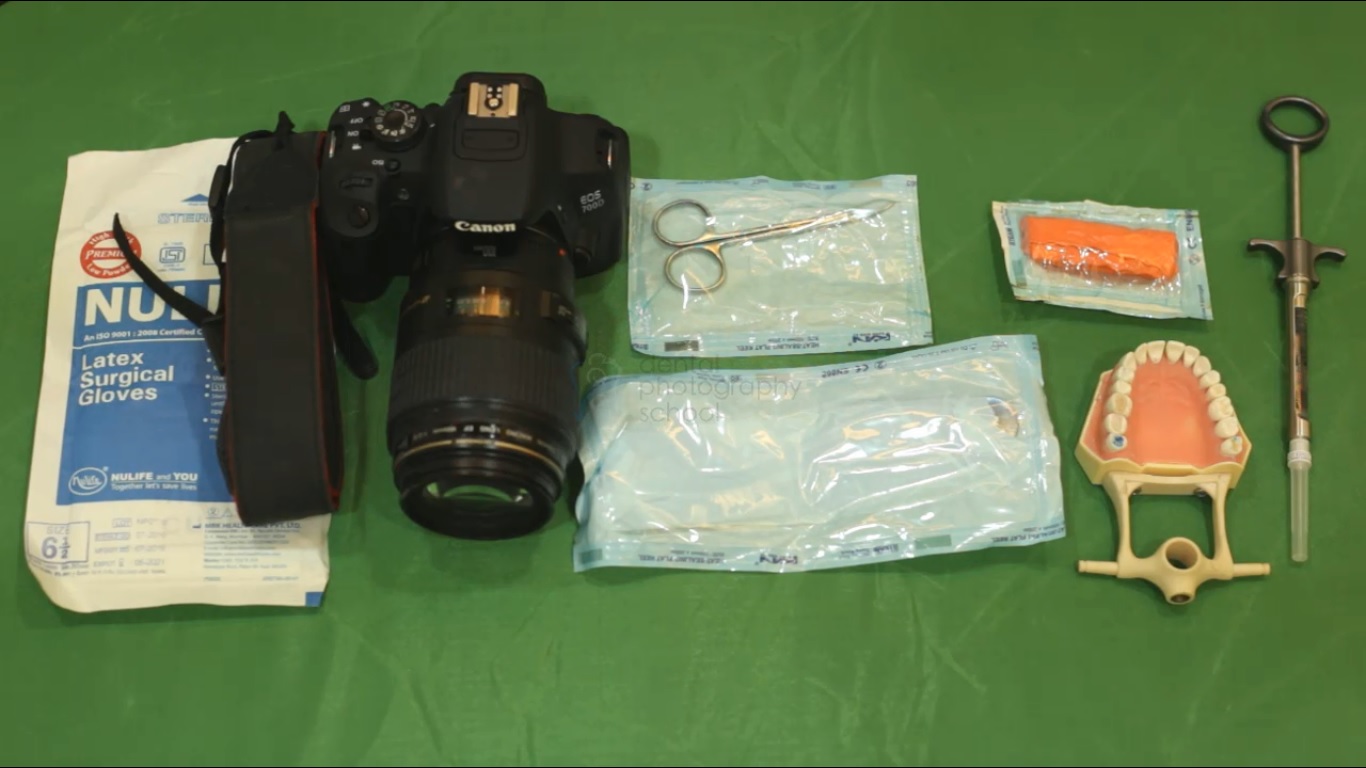
Things you will require:
‘Powder-free’ sterile gloves in the biggest size available or powdered gloves inverted inside out suck that the powdered side is outwards.
Pair of autoclaved scissors
DSLR & a 100mm MACRO lens
Sectional/ Full arch mirror (Contra-angled, rigid and front surface coated)
An autoclaved microfiber cloth for cleaning the blood and saliva on the mirror.
(Mirror should not be cleaned with cotton, gauze piece or tissue paper)
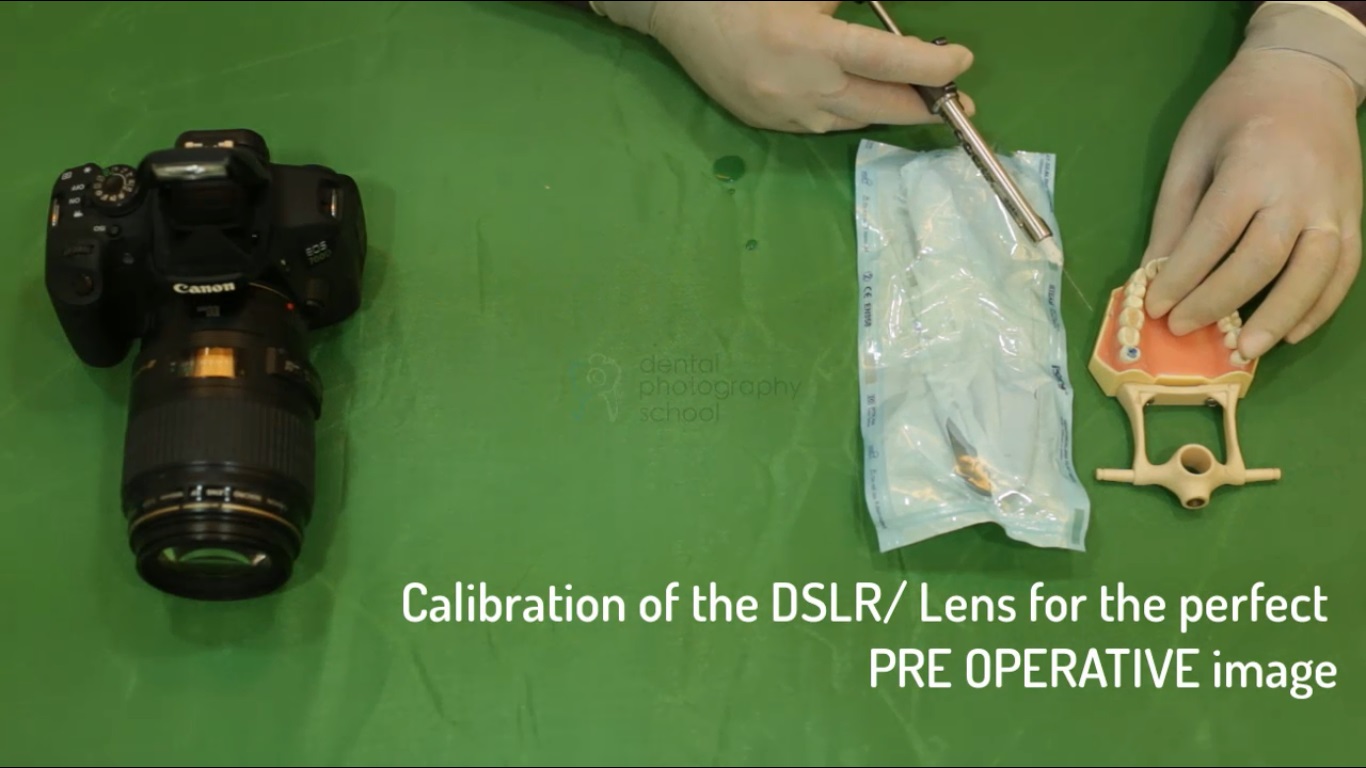
Figure 1 Prepare your DSLR: Remove the neck strap of your DSLR. Set the LCD brightness of the DSLR to MAXIMUM
Anaesthetise the field to be operated on. Wait for 5-10 minutes for the anaesthesia to act. It is only during this duration that you must set the camera and your lens.
Figure 2
Keep the sectional mirror ready if it is a quadrant surgery like we have shown in the image.
A wider area would require a full arch occlusal mirror.
Figure 3
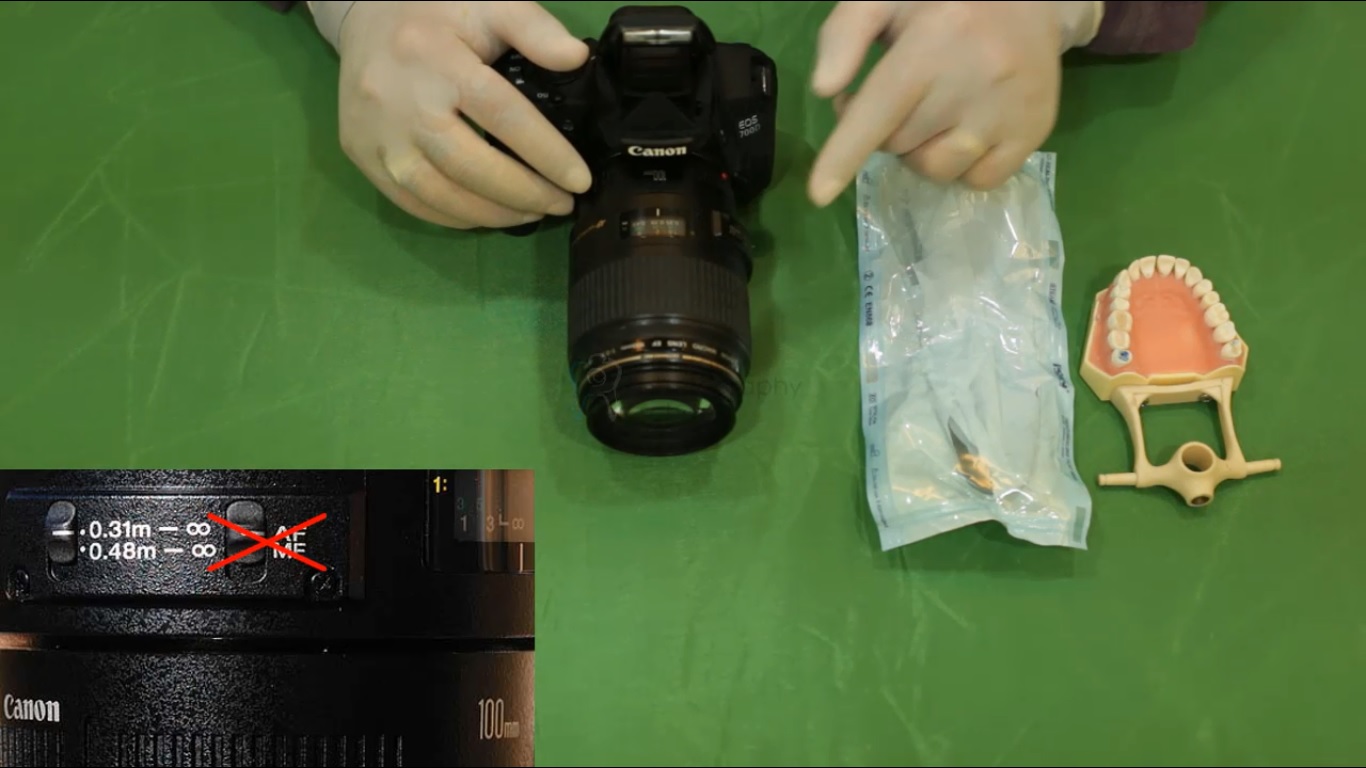
Visualize the area to be photographed. Set the magnification ratio.
(To understand magnification ratio in detail visit www.dentalphototgraphyschool.in)
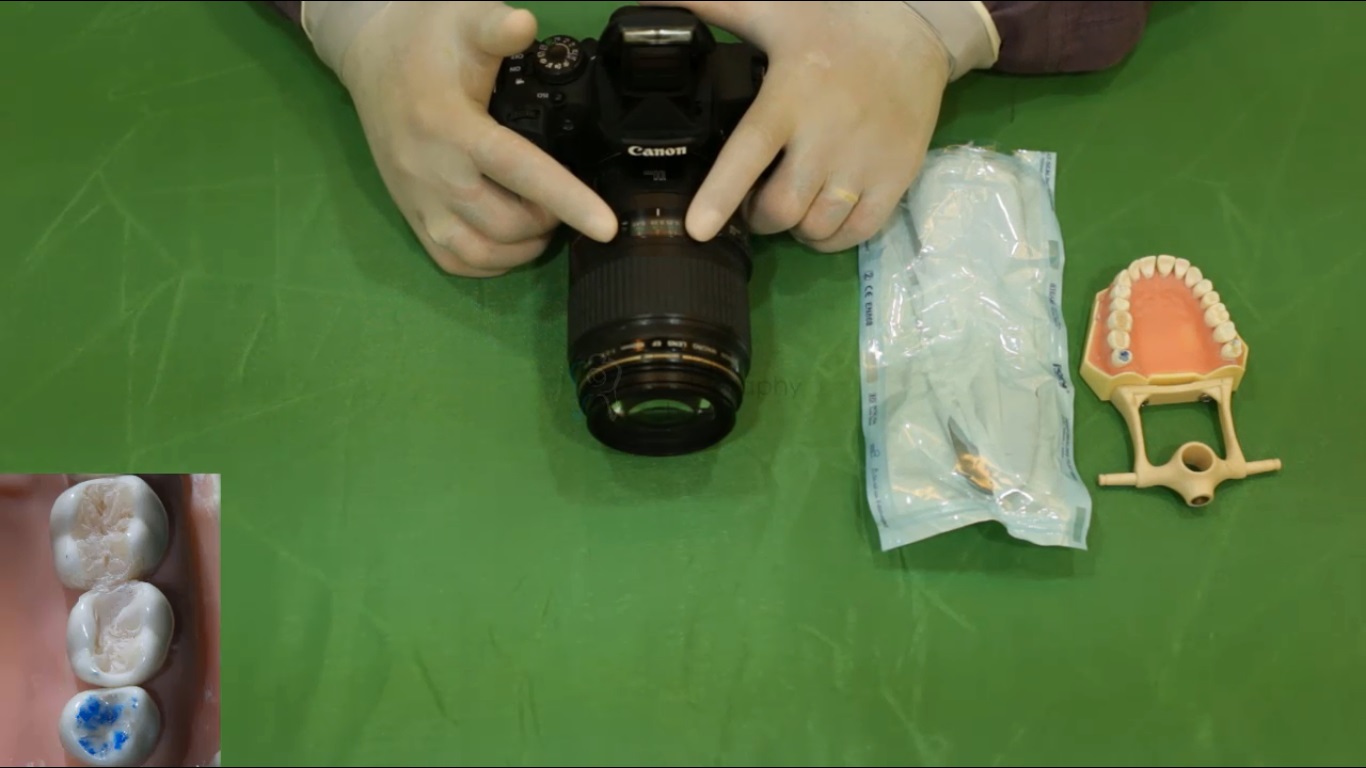
Settings on DSLR are arbitrary initially.
Figure 4
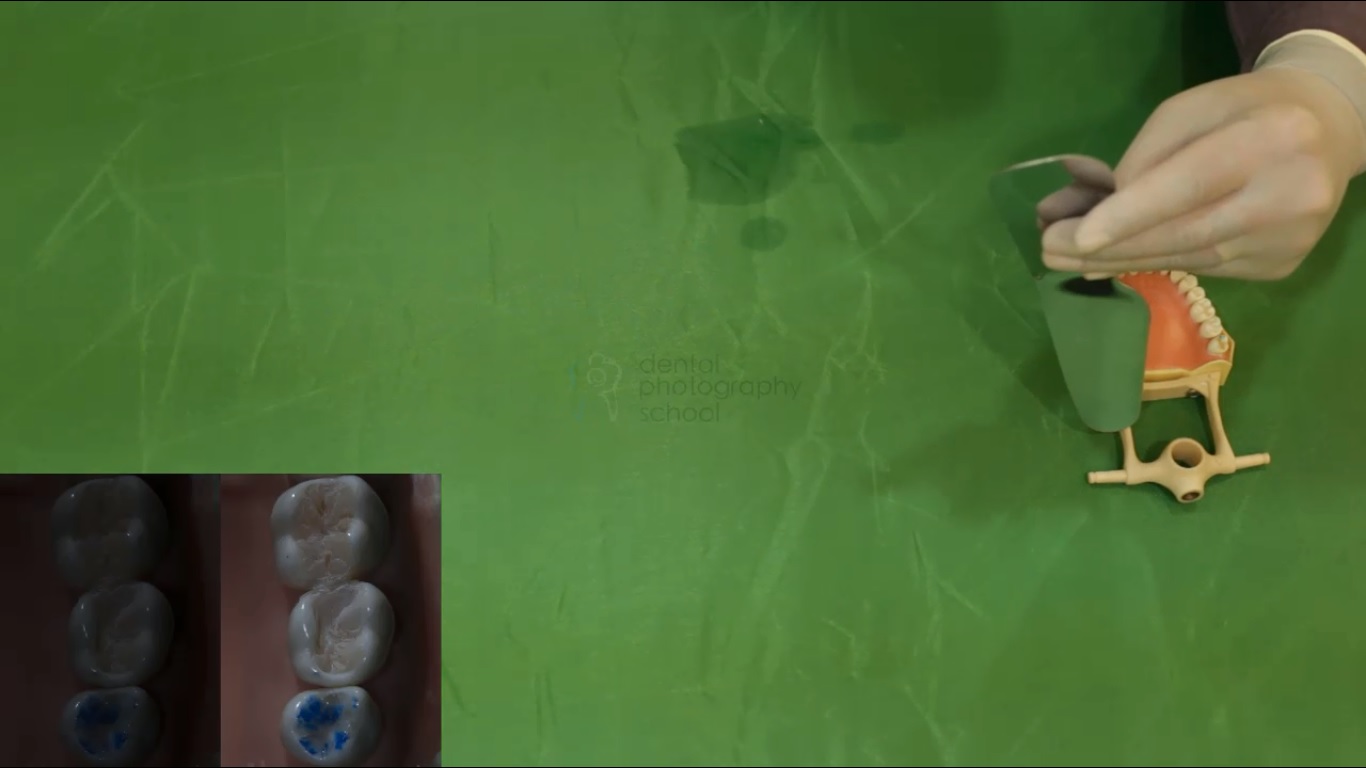
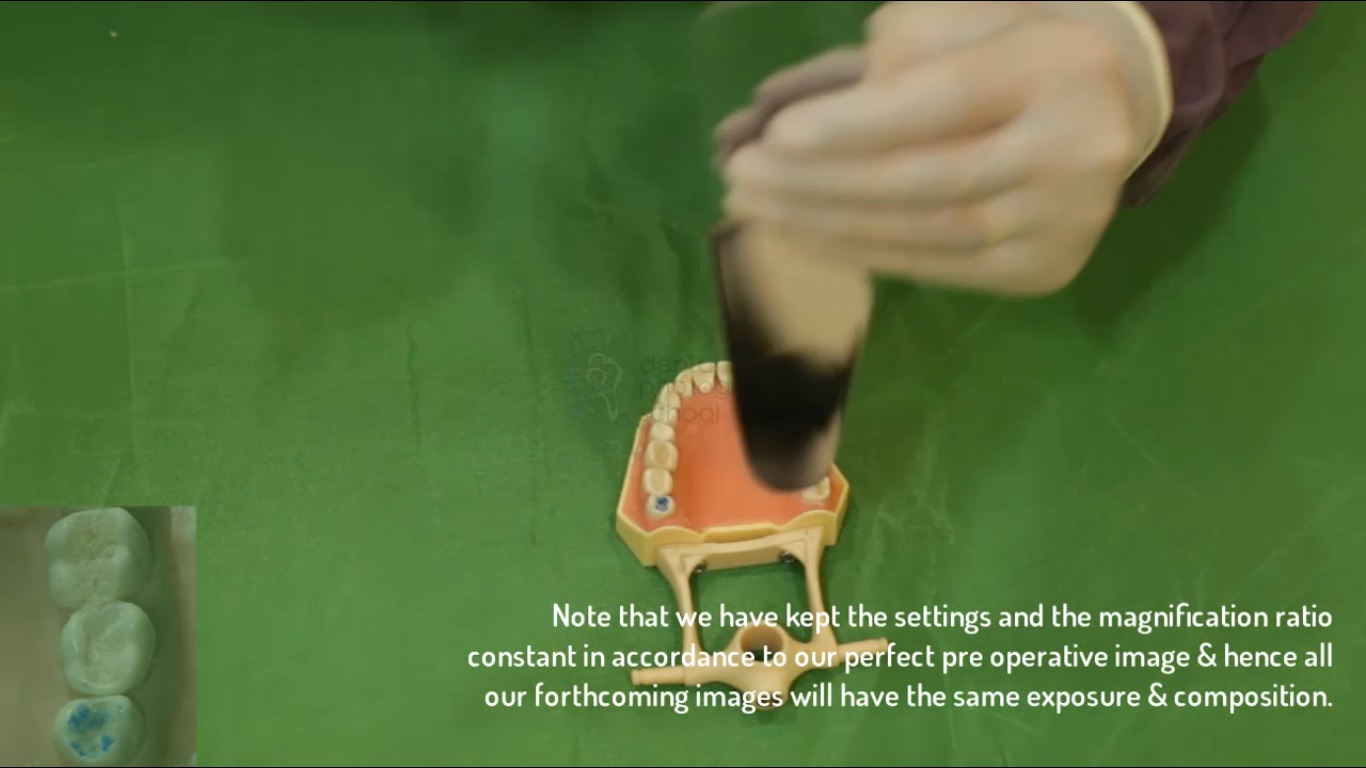
We can practice the shot on a model or a typodont before the patient comes in. Since we already know what we are working on, the image that we get on the typodont will be similar to what we expect in the patient's mouth.
Figure 5
Position the sectional mirror. Take a series of pictures by changing the settings based on the exposure triangle. The reader is requested to understand the exposure triangle by taking a succession of images each better than the previous one.
If you do not know about the exposure triangle, you may keep the DSLR on Auto mode (not ideal)
Figure 6
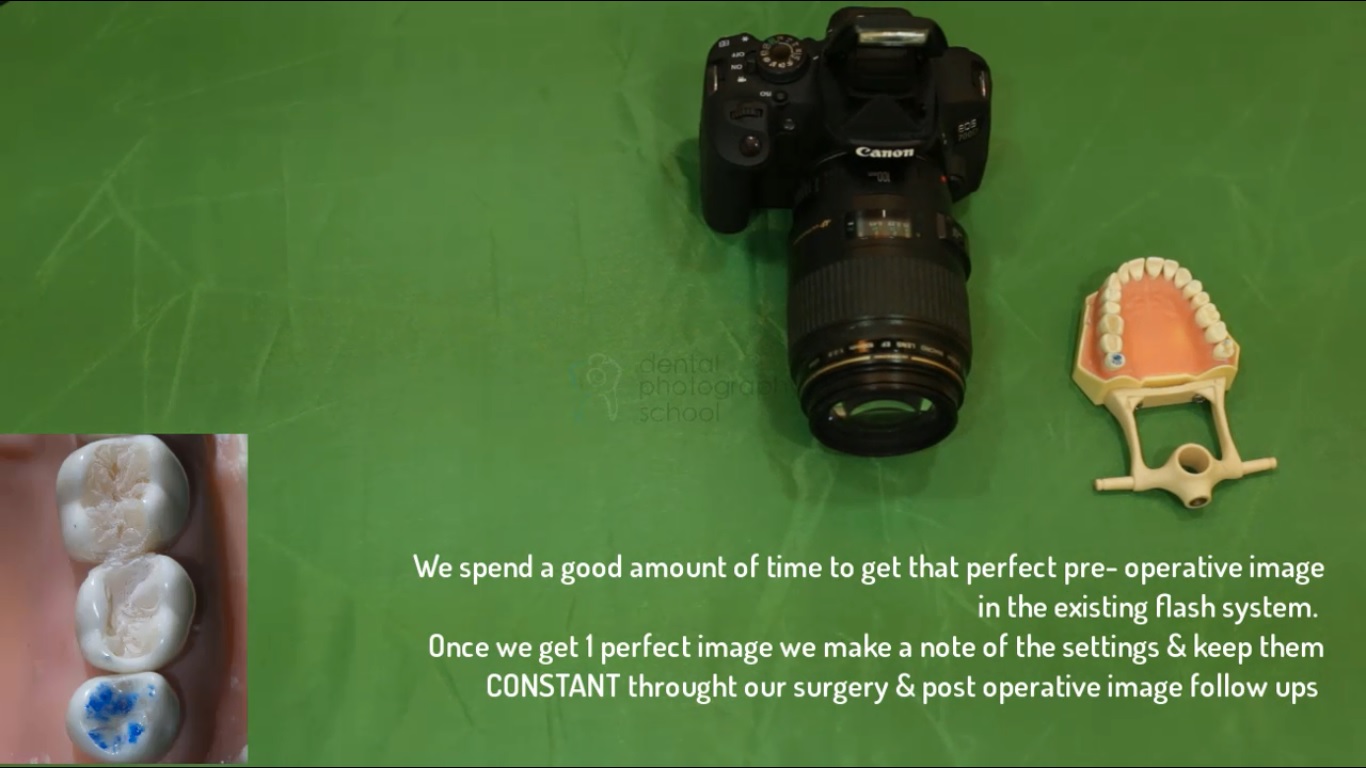
NOTE the exposure triangle settings in your patients' case history paper. (Always shoot on RAW mode, not JPEG mode). Once we get a perfect image, we keep the settings constant throughout the documentation process. The reader is requested not to change the settings or magnification ratio.
Figure 7
This small effort in making a note of the settings will ensure that all your images have the same exposure and composition and help in standardizing the documentation of the case.
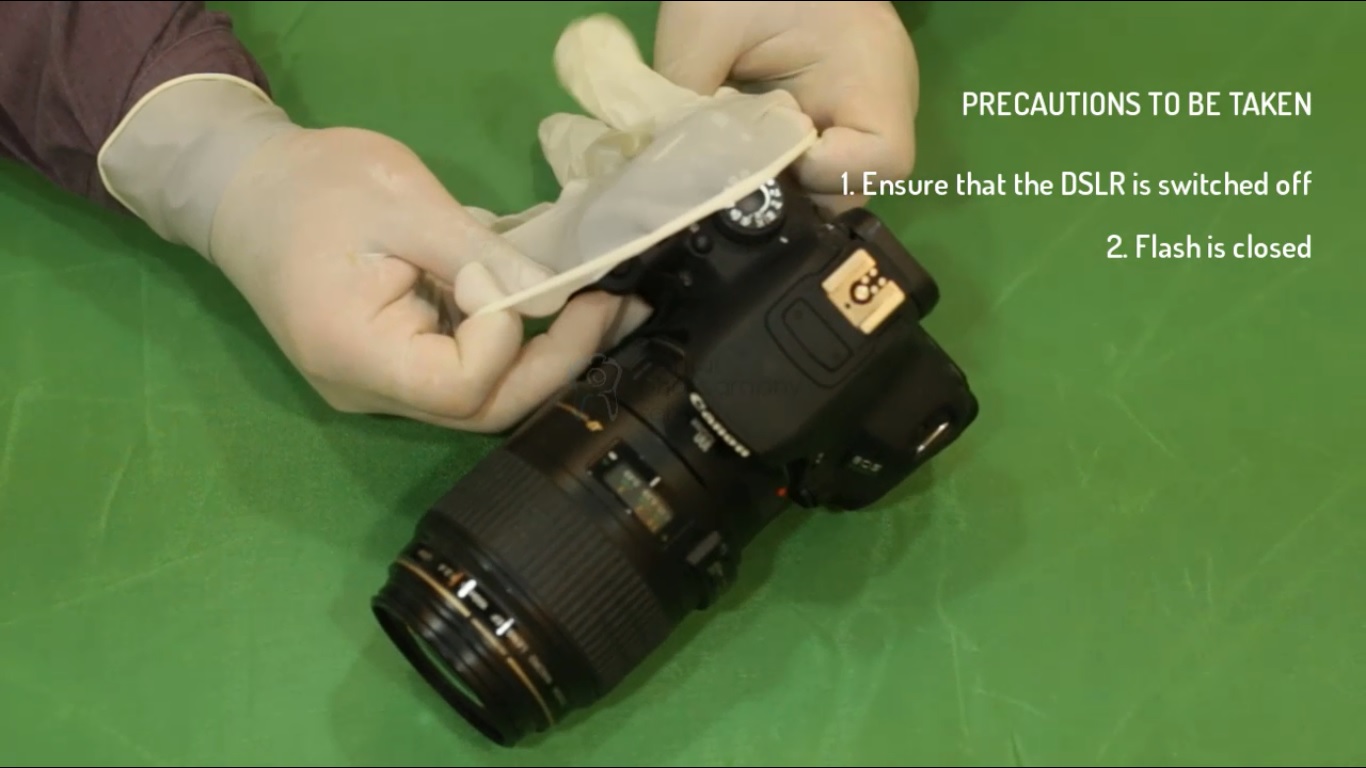
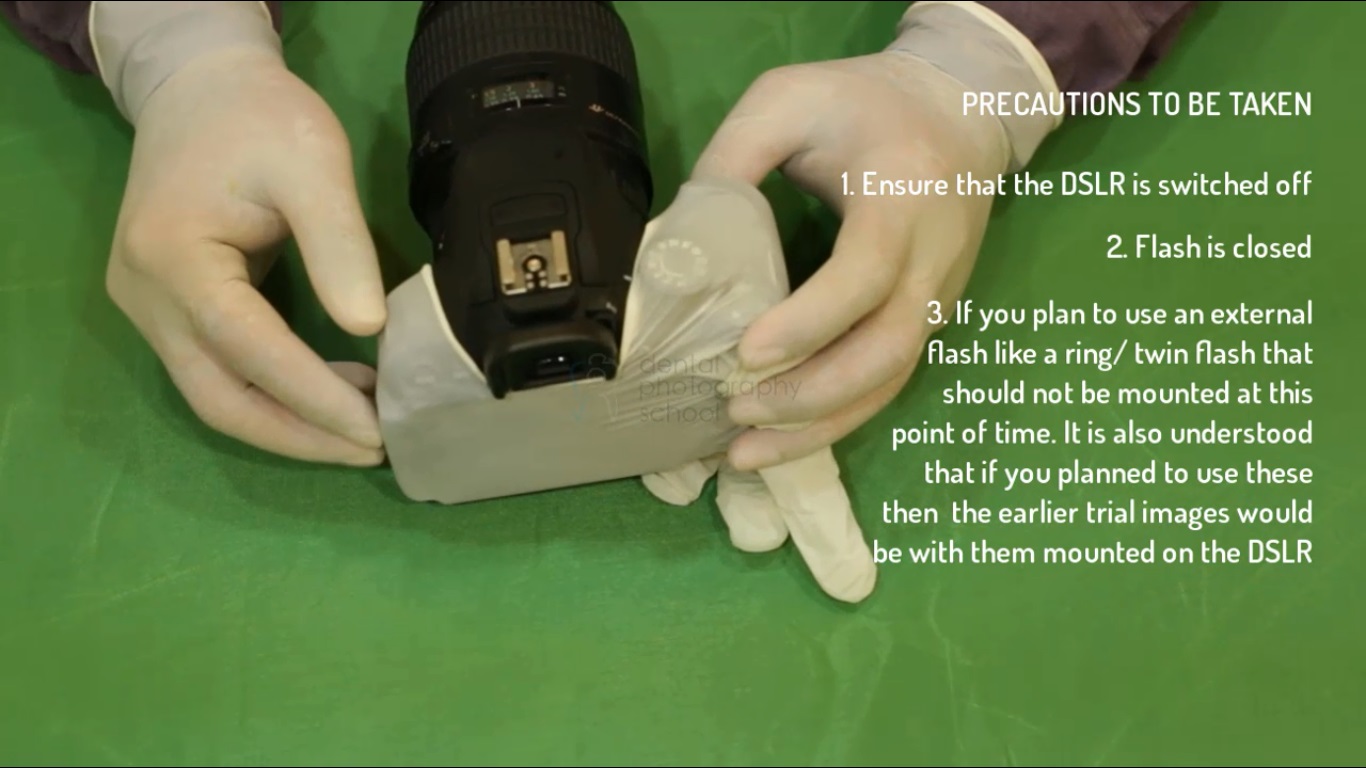
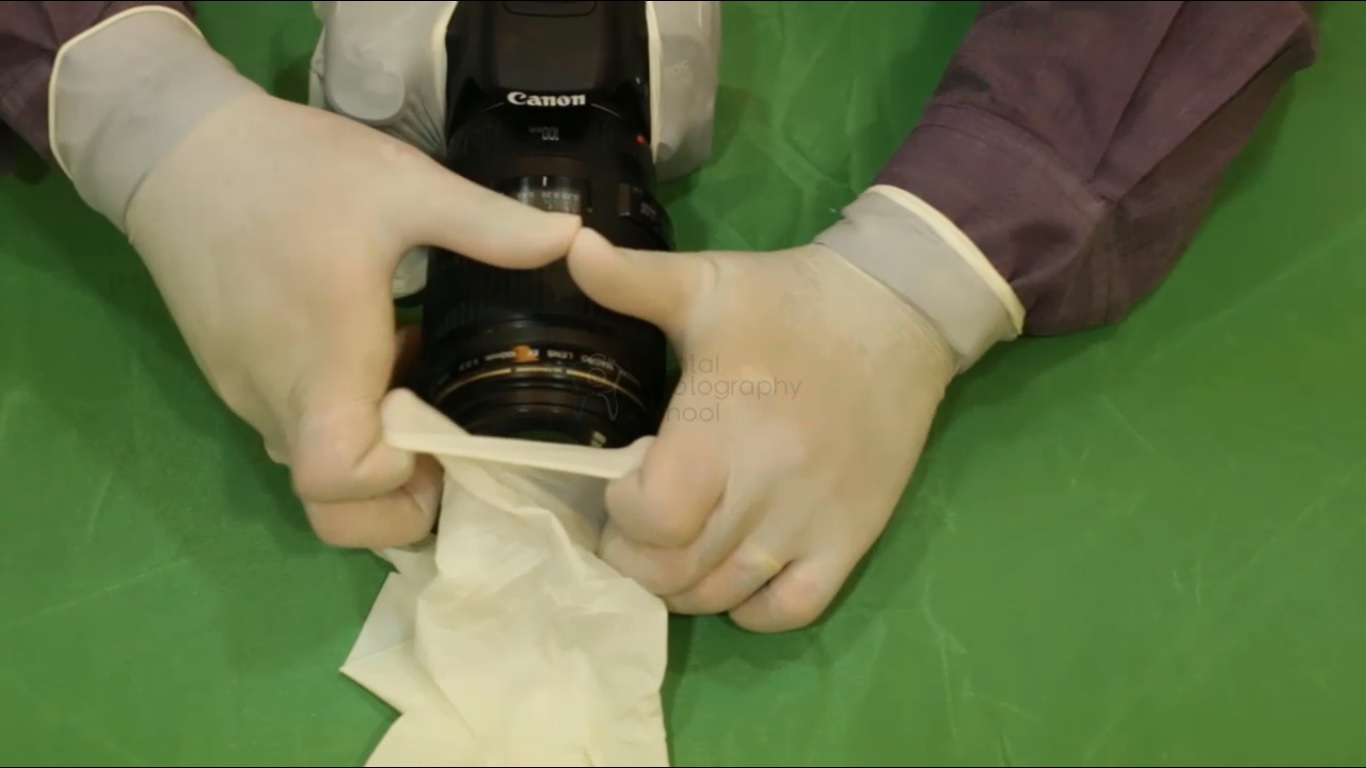
Next, we demonstrate how the DSLR is covered with a sterile glove. Some precautions need to be taken during this procedure:
Make sure the DSLR is switched off and the flash is closed.
Do not mount any external flash like a ring/twin flash at this stage.
The viewfinder should not be covered by the glove.
Figure 8
ALL the areas where you will handle the DSLR should be properly covered by the gloves. Here is how you place the glove on the right side and then pull it over the left side.
Figure 9
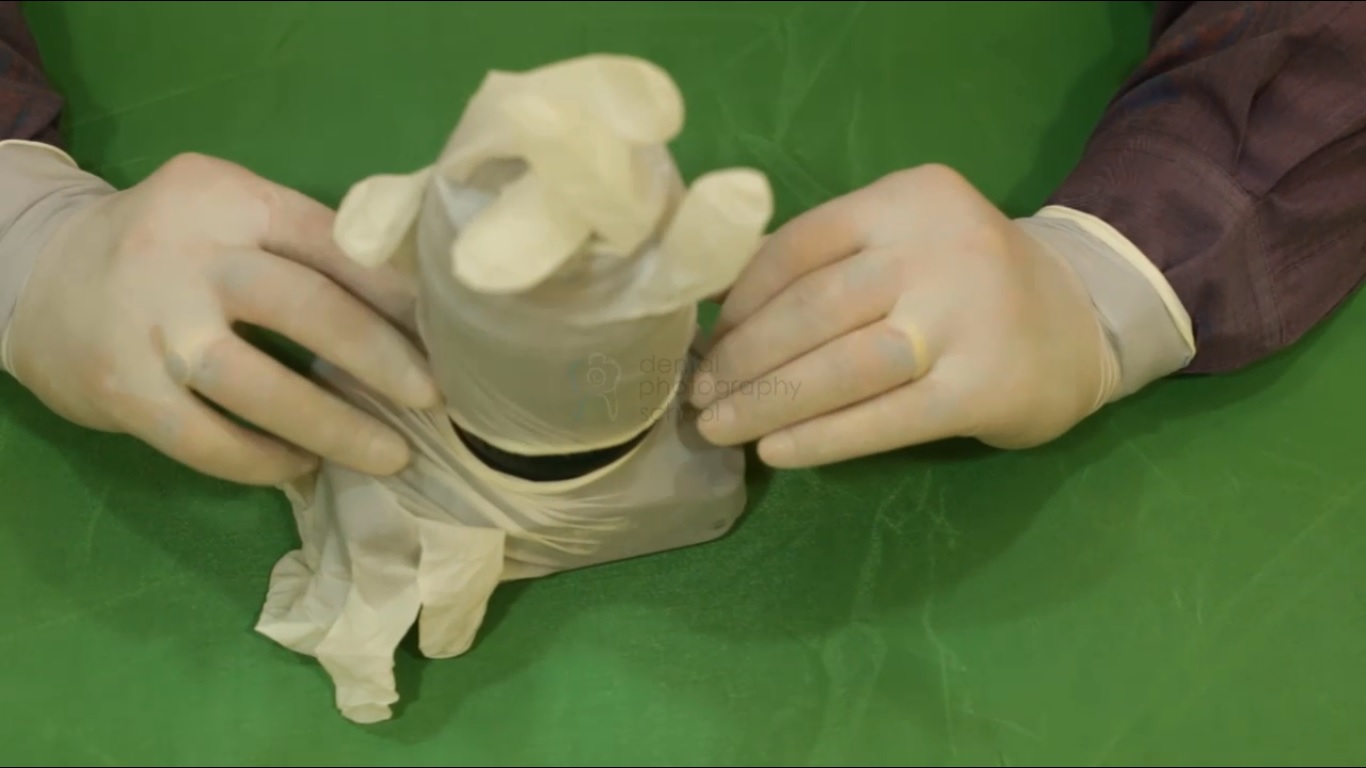
Next step, you must cover the Macro lens. Slide the second sterile glove over the Macro lens. Be careful that you do not change the magnification ratio accidentally by rotating the focusing ring.
Figure 10
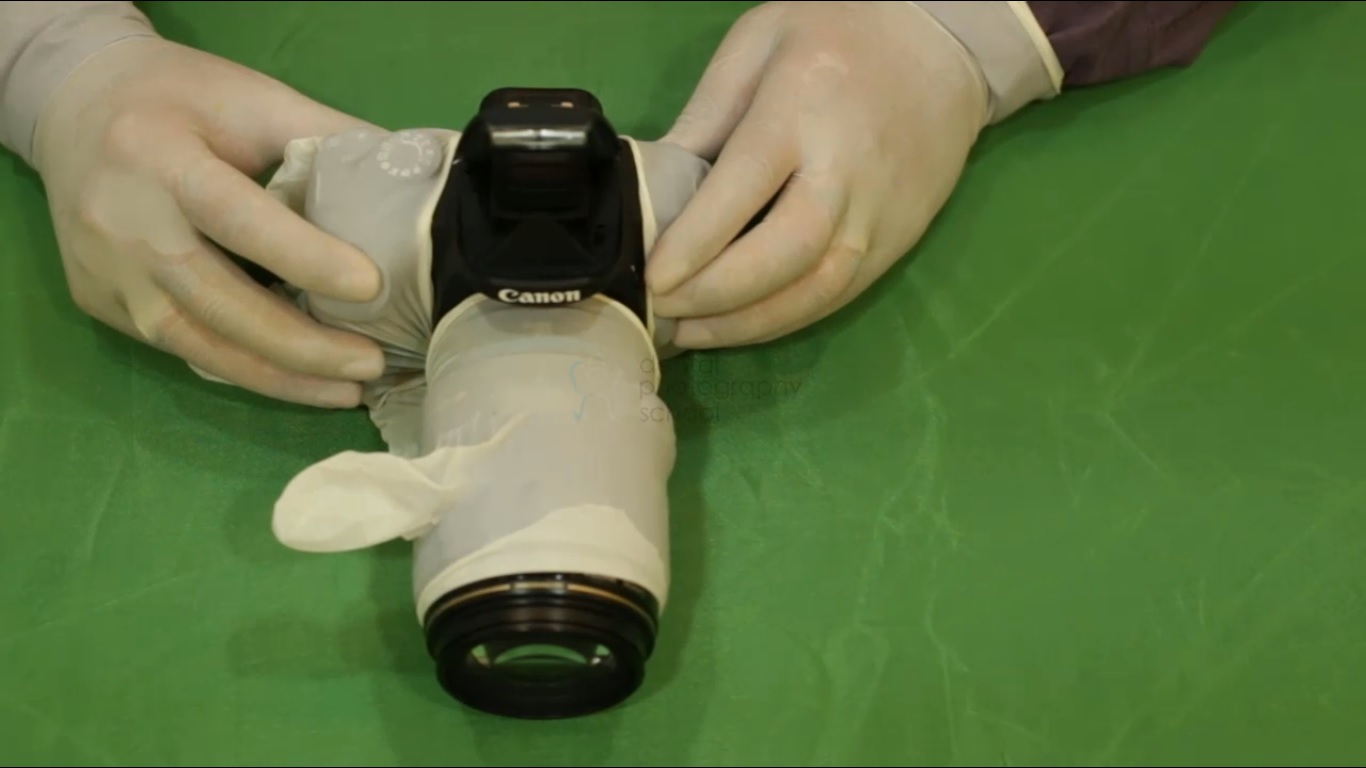
Confirm the working of the DSLR
Figure 11
Cut off the finger extensions. Fold any excess interfering glove material behind.
Figure 12
Ensure that the same image is achieved
Figure 13
Once the DSLR is ready- CHANGE your own gloves- And you’re ready to start!
After the procedure simply cut off the gloves from the DSLR.
With discussions ranging from microbiology concepts to protocols for clinical asepsis, it is imperative that we make an effort to document cases in a responsible manner by following proper infection control techniques.
A video showing the entire protocol can be seen here.
Author:
Dr Mayur Davda is a practising dentist in Mumbai with a keen interest in biomimetic dentistry, endodontics, aesthetic dentistry & dental photography. He is the resource person for the biggest course on dental photography held at Manipal college of dental sciences, Manipal. The Aesthetic fellowship program at Dr.D. Y. Patil university school of dentistry has him as a guest lecturer for dental photography training. With an experience of more than 15 years in photography, he is also the mentor for dental/medical photography at Canon India. He was interviewed by Better photography, smart photography magazines for excellence in fine art photography and was also on the cover shot of the same. He has been a judge for many national level photography competitions namely Canon Photomarathon. He has been the director of Dental Photography School since 2013. This is the only institute dedicated to dental photography & dermatology photography training as well as research.
Dr Mayur Davda
Canon Photomentor www.edge.canon.co.in
President www.dentalphotographyschool.in
Dentist www.aumdentalclinic.com
Artist www.liquidcanvas.in
Mentor for Integrated dental photography course,
MCODS, Manipal University
In preparation for the upcoming Greater New York Dental Meeting (GNYDM) to be held from 25 to 30 November at the Jacob K. Javits Convention Center in New ...
DAMASCUS, Syria: The use of clear aligners in mild to moderate cases of malocclusion has been the subject of numerous studies, particularly as more dentists...
Artificial Intelligence (AI) has been pivotal in refining diagnostic accuracy and revolutionizing care. Of all the applications that AI can provide us, ...
Silver nanoparticles (Ag NPs) are one of the most unique nanotechnology-based products among all metallic nanoparticles. In this article, Dr. Aditya K. S. ...
For those who have been paying attention to the latest news in the technology space, you will most certainly have noticed that OpenAI recently launched ...
Dr. Rohan Jagtap—the author of the book “Artificial Intelligence in Dentistry”—was interviewed by Dr. Amisha Parekh, PhD candidate at the University...
Education
Live webinar Mon. 13 July 2026 9:00 pm IST (New Delhi)

 International / International
 Brazil / Brasil
 Canada / Canada
 Latin America / Latinoamérica
 USA / USA
 Austria / Österreich
 Bosnia and Herzegovina / Босна и Херцеговина
 Bulgaria / България
 Croatia / Hrvatska
 Czech Republic & Slovakia / Česká republika & Slovensko
 France / France
 Germany / Deutschland
 Greece / ΕΛΛΑΔΑ
 Hungary / Hungary
 Italy / Italia
 Netherlands / Nederland
 Nordic / Nordic
 Poland / Polska
 Portugal / Portugal
 Romania & Moldova / România & Moldova
 Slovenia / Slovenija
 Serbia & Montenegro / Србија и Црна Гора
 Spain / España
 Switzerland / Schweiz
 Turkey / Türkiye
 UK & Ireland / UK & Ireland
 China / 中国
 Pakistan / Pākistān
 Vietnam / Việt Nam
 ASEAN / ASEAN
 Israel / מְדִינַת יִשְׂרָאֵל
 Algeria, Morocco & Tunisia / الجزائر والمغرب وتونس
 Middle East / Middle East

 Dr. Fernando FranchLive webinar
 Dr. Nicolas OuelletRegister now1CELive webinar

 Dr. Nisha D’Silva BDS, MSD, PhD, Dr. Kıvanç Bektaş-KayhanRegister now1CELive webinar
 Federico ZunicaRegister now1CE


To post a reply please login or register