Composite Resin is an extremely versatile and essential material in a dentist's inventory. These materials are technique sensitive, but if applied correctly they can help us provide beautiful and aesthetic restorations to our patients at a fraction of the cost as compared to indirect restorations. Apart from being bio-mimetic and minimally invasive, an added advantage of using these materials is reduced dependency on a Dental Lab technician for good results. And since it is done chairside, everything is in the operator's control.
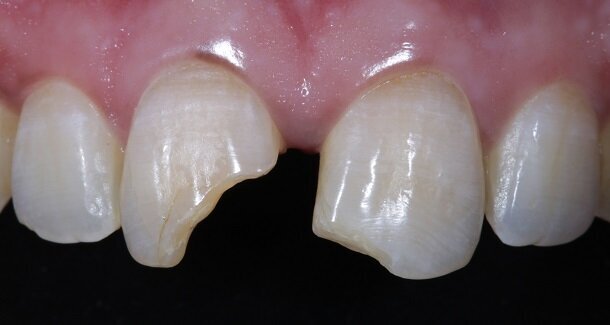
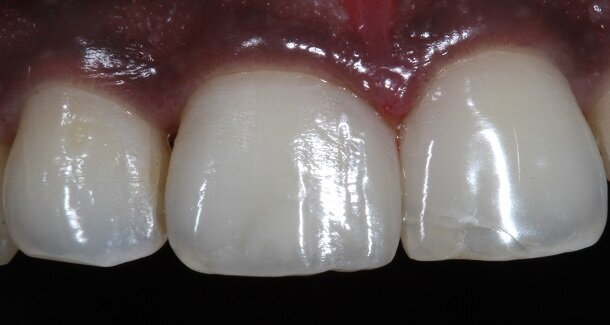
Presenting a case of a 22 yr old male, who reported to our dental office with fractured Maxillary Central incisors many years ago [Figures 1 and 2]. On examination both Maxillary Central incisors had fractures with pulp exposures. IOPAR showed large peri-apical lesions in both teeth. There was no mobility seen in either teeth, but discolouration was seen in both. Non-surgical Endodontic treatment followed by Bleaching and Direct composite restorations (2 weeks post bleaching) were planned.
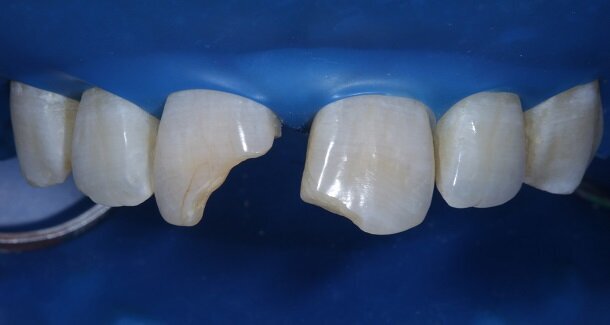
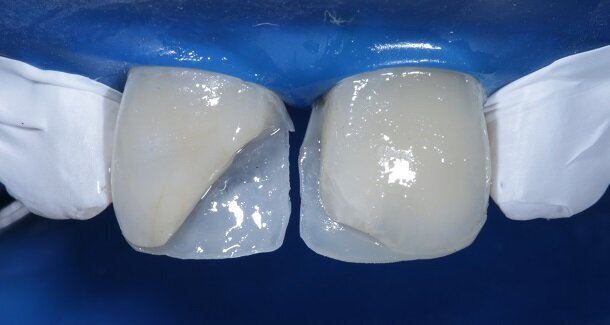
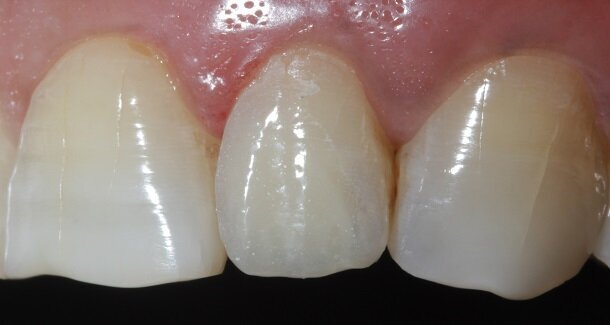
The figures show the clinical work flow involved. In the 1st appointment Oral prophylaxis, oral hygiene instructions were followed by an impression that was sent to the lab for a wax up [Fig 3 and 4]. In the subsequent appointments, Endodontic treatment was followed by Intra and extra coronal office bleaching using the Pola office bleaching kit. After two weeks, the shade stabilised post bleaching. Shade selection, rubber dam isolation and preparation was done on both the teeth to receive Direct composite veneers so as to close the midline diastema as well as correct the fractured teeth and the slight mal-alignment. Controlled Body Thickness (CBT) technique of layering was used with 3M Z350XT shades - Dentin shades A3, A2 and Enamel shades A2, clear translucent [Figures 5 to 11]. This was followed by the Finishing and polishing protocol as described in the figures.
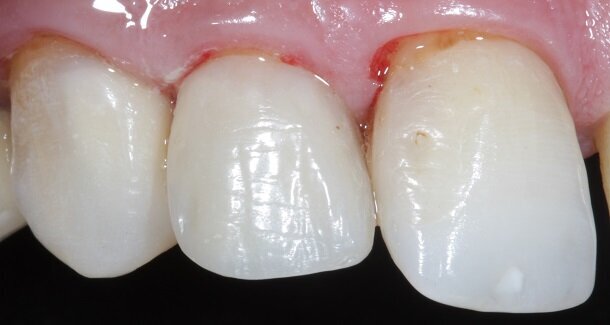
Fig 12- Gross finishing for the outline of the tooth was achieved using Red ring (composite finishing) tapered rounded bur. Almost 80% of the finishing can be done using this bur. It also helps in creating surface macro and micro anatomical variations. For better control, this bur can be used on a contra-angled hand-piece along with a convertor.
Fig 13 and 14 -Transitional Line angles were marked using a pencil and made prominent using medium grit 3M Soflex Discs proximally. The apparent faces of both the teeth were thus, created.
Fig 15 and 16 - For the surface texture; vertical surface macro-anatomy showing developmental grooves (mesial and distal) were marked using a pencil and created using the red ring finishing bur.
Fig 17- Horizontal surface micro-anatomy, that is, the Perikymata or imbrication lines were marked cervically and incisally, using a pencil and created using the red ring finishing bur.
Fig 18 - Pre-polishing was done using a 3M soflex white spiral under pressure on a contra-angled handpiece.
Fig 19 and 20 - Polishing was done by using 3M soflex beige and purple spirals in sequence.
Fig 21 - Final polishing for high gloss was done using a dry Buff (unidirectional, high speed and feather touch).
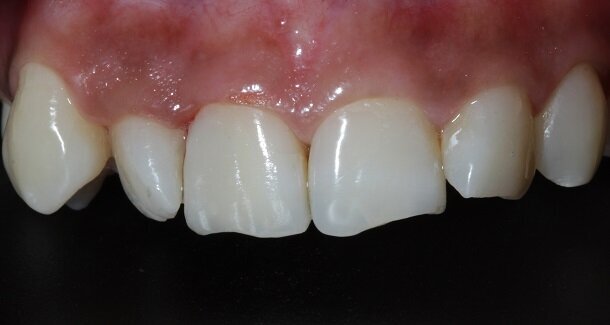
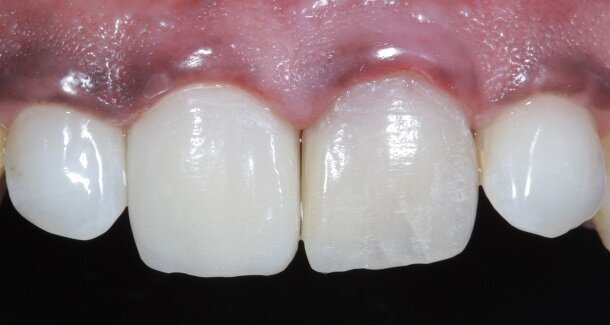
Fig 22, 23 and 24 - In the post-rehydration follow-up appointment, the patient requested us to reduce the lengths of the central incisors slightly, and we reduced it by 0.5mm till he was satisfied.
Discussion
Characterisation begins during Dentin Layering itself. [Fig 9] Shape of the tooth is extremely important. A well-made putty key from a wax-up or a mock-up can help in maintaining shape of the tooth. [Fig 3 and 4]
Line angles can be used to create illusions of the tooth being wider or narrower as needed, especially in diastema closures. For better control, finishing burs can be used in the contra-angled handpiece with the help of a convertor.
It does not matter which company’s materials, instruments or finishing polishing kits are used. It is essential to use the recommended finishing and polishing protocols in the correct sequential manner in order to get predictable results each time.
Photography and documentation help in refining protocols and improving skills as the result can be clearly seen in a well made picture.
One of the biggest advantages of doing direct restorations is that modifications can always be done chairside depending on what the patient wants.
Conclusion
A well polished direct restoration can add a lot of character to a patient's smile, last a good long time and all this, at a fraction of the cost of an indirect restoration. By strictly adhering to finishing and polishing protocols, we can achieve life-like restorations that are not easily discernible to the eye.
Acknowledgements
I would like to thank Dr. Indranil Majumdar, Dr. Komal Majumdar, Dr. Rajeev Chitguppi, Dr. Vishal Gupta, Dr. Prashant Hatkar, Dr. Varsha Rao and Dr. Mayur Davda for their constant encouragement and support. A big thanks to Dr. Niranjan Prabhakar from Dental Tribune for this opportunity.
Conflict of interest
There are no conflicts of interest.
Tags:
Composite resin is a material that is able to mimic natural tooth structure, its optical properties and aesthetics. Often due to trauma or caries, the ...
OAK RIDGE, Tenn., U.S.: To address the issue of dental restoration failures, researchers have started studying how nanoparticles with antibacterial ...
This article is a case report of a direct composite restoration of a fractured central incisor where the proximal contact was developed using the Unica ...
Mumbai, India: Organized by BuzzDent, “The Complete LAYERS Composite Course” by Dr. Jordi Manauta took place in Mumbai from August 2nd to 4th, 2024, in ...
All aspects of the esthetics can be more critically evaluated (e.g. color, shape, size, width, intensity of color, value, translucency, form, surface ...
One of the biggest complaints we face in Class 2 type restorations is food impaction due to improper contacts.
When we used the matrix systems meant for ...
According to the latest systematic review and meta-analysis, alumina sandblasting is the best method for zirconia surface cleaning that improves the ...
Dental Tribune South Asia has launched COVIDEAS - an initiative to encourage innovative thought processes and bring innovative ideas to the attention of ...
Composite resins have been the choice of restorative material for more than 20 years. Most clinicians have mastered the layering protocol for anterior teeth...
With dentistry evolving beyond clinical expertise, two pioneering programmes — APLBED and EBMD — designed in collaboration with the Indian School of ...
Live webinar
Mon. 13 July 2026
9:00 pm IST (New Delhi)
Live webinar
Tue. 14 July 2026
7:30 pm IST (New Delhi)
Live webinar
Wed. 15 July 2026
5:30 pm IST (New Delhi)
Live webinar
Thu. 16 July 2026
4:30 am IST (New Delhi)
Live webinar
Thu. 16 July 2026
6:30 pm IST (New Delhi)
Dr. Nisha D’Silva BDS, MSD, PhD, Dr. Kıvanç Bektaş-Kayhan
Live webinar
Thu. 16 July 2026
10:30 pm IST (New Delhi)
Live webinar
Fri. 17 July 2026
2:30 am IST (New Delhi)

 International / International
 Brazil / Brasil
 Canada / Canada
 Latin America / Latinoamérica
 USA / USA
 Austria / Österreich
 Bosnia and Herzegovina / Босна и Херцеговина
 Bulgaria / България
 Croatia / Hrvatska
 Czech Republic & Slovakia / Česká republika & Slovensko
 France / France
 Germany / Deutschland
 Greece / ΕΛΛΑΔΑ
 Hungary / Hungary
 Italy / Italia
 Netherlands / Nederland
 Nordic / Nordic
 Poland / Polska
 Portugal / Portugal
 Romania & Moldova / România & Moldova
 Slovenia / Slovenija
 Serbia & Montenegro / Србија и Црна Гора
 Spain / España
 Switzerland / Schweiz
 Turkey / Türkiye
 UK & Ireland / UK & Ireland
 China / 中国
 Pakistan / Pākistān
 Vietnam / Việt Nam
 ASEAN / ASEAN
 Israel / מְדִינַת יִשְׂרָאֵל
 Algeria, Morocco & Tunisia / الجزائر والمغرب وتونس
 Middle East / Middle East

 Dr. Fernando FranchLive webinar
 Dr. Nicolas OuelletRegister now1CELive webinar

 Dr. Nisha D’Silva BDS, MSD, PhD, Dr. Kıvanç Bektaş-KayhanRegister now1CELive webinar
 Federico ZunicaRegister now1CE


Brilliant article and documentation. India needs this more and more